Friday, Oct 03, 2014 at 13:39
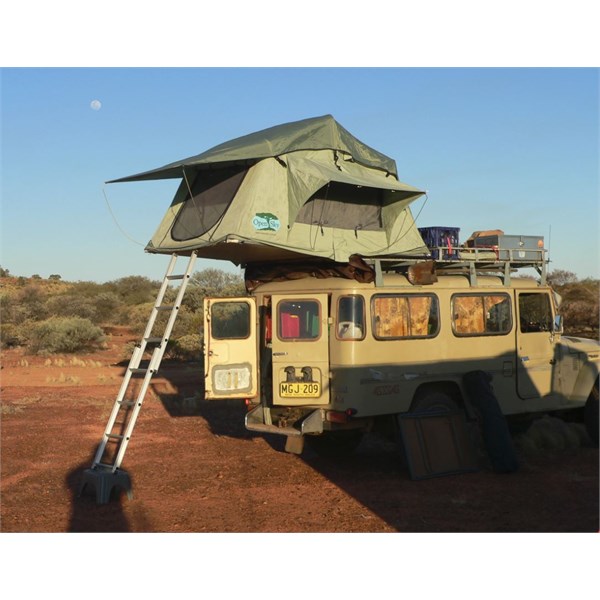
There are some compromises and which one you get might depend on your intended use. I had a Howling Moon which was one of the first available in Australia - it was very similar to the larger ARB tents, though it had a heavier/thicker canvas which blocked most of the light (which could be good or bad depending whether you like to wake up with the sun). It had a foam mattress which the previous owners had made a fleece covering for and was very comfortable - I slept better in the
tent than at
home. If you're moving every day or so, then they're great, but if you like to set up a base
camp for a few days and do short trips from there it's a bit of a nuisance because you have to pack up your whole
campsite to drive anywhere.
At one stage on the
Gibb River Rd/
Mitchell Plateau, we ended up travelling with a couple who had a Maggiolina
tent on their car. The Maggiolina was quicker to set up and pack up (they just unclipped the
top (hard) cover, inserted a handle and wound the
roof up - a bit like a Jayco camper) whereas the Howling Moon (and ARB) tents have a cover that you need to unzip, then pull off (sliding the edge out of the sail-track) and then find somewhere to put it (noting that it could be quite dusty or wet, or even muddy - I usually rolled it loosely, dirty side in and put it in the front passenger footwell), unfold the
tent, undo the elastic shock cords from inside and set up the frame to hold the awning over the ladder. Once the Howling Moon was set up, we could open large windows which had huge awnings over them so you could have the windows open in any weather - even rain coming it at 30 degrees from horizontal! The Maggionlina has a couple of tiny windows in the sides, but they had no weather protection, so if you're going to spend time in the steamy rainy tropics, it might be better to get something more like the Howling Moon.
Both of them you could leave your bedding in - the Maggiolina was wound back down using the handle, then the sides had to be tucked in so they weren't pinched in the "lid" and then the lid was clipped shut. The Howling Moon was again a little more complicated - clip the shock-cords back in (these pulled the sides of the
tent in as the
tent was folded shut), remove and store the frame for the awning over the ladder extension, then fold the
tent shut. Then came the fun part of putting the cover back on - slide it in the sail-track, throw it over the
tent and zip it all around, which could be a quick task, or a mongrel, depending how flat you could get the
tent to fold down (which depended on how much bedding you left inside, where it was stored, and most importantly: how that awning over the ladder ended up!). You can get them without the awning over the ladder, but I think the benefits of the awning over ladder outweigh the added difficulty in packing the
tent away.
AnswerID:
539862
Follow Up By: tim_c - Friday, Oct 03, 2014 at 13:40
Friday, Oct 03, 2014 at 13:40
Oh, the Maggiolina was just like the Autohome
tent someone mentioned above.
FollowupID:
825493
Follow Up By: Member - Scott M (NSW) - Friday, Oct 03, 2014 at 14:44
Friday, Oct 03, 2014 at 14:44
Tim, you summed up my experience between the two in a nut-
shell .... I could have written that word for word.
My Open-Sky was a great
tent, very comfortable (with a self inflator on
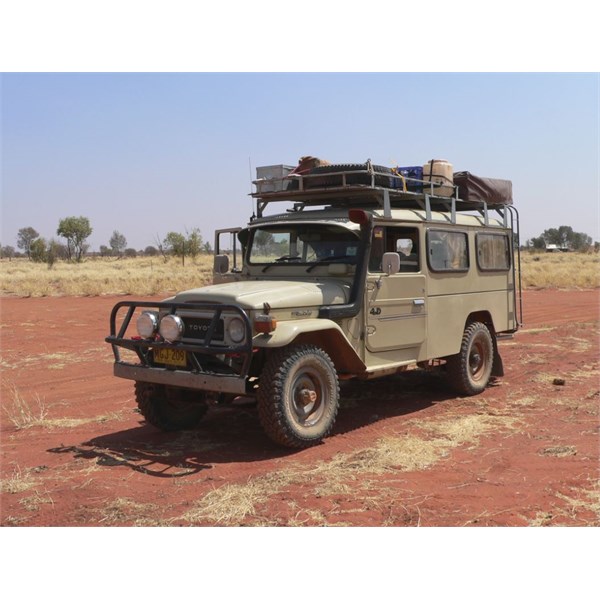
top of the matress), however I had it on a
roof cage on
top of a 40 series troopy, so the sucker was high and involved a fair bit of up & down to pack away. You had to make sure the bedding was packed flat otherwise it was a pig to fold, otherwise a great
tent.
The Maggiolina is a breeze, literally less than 1 minute to erect, however about 3-4 mins to put away as the scissor legs & bevel are inside the
tent, plenty of room for bedding, however you've got to clear the bedding form the ends (just pull the pillow and covers in a bit when you exit in the morning) otherwise they can get stuck in the legs. A bit more tucking in to clear the lid. Not a nuisance, just a bit of care is needed. The previous owner ran some sail-track along the long sides of the lid and made a couple of awnings that can be erected with extension poles (spigots) and a length pole with eyelets. I don't use them unless the weather looks dodgy, however it gives very good coverage on both sides of the
tent.
FollowupID:
825494
Follow Up By: tim_c - Friday, Oct 03, 2014 at 16:28
Friday, Oct 03, 2014 at 16:28
Thanks Scott.
One other thing I neglected to mention was that the Maggiolina took up the whole
roof of the car - with the Howling Moon you could possibly fit something else up
top along with the
roof top tent.
And another thing: the Maggiolina appears more streamlined which may be important if you're doing a lot of high speed highway travel. I'm not sure that I particularly noticed much difference in fuel consumption with the Howling Moon up
top, but the car did have more trouble maintaining speed on the hills. I often rolled up the ladder awning at the front of the
tent as I zipped the cover on (which was usually the biggest cause of any difficulties I had in zipping the cover up!) with the idea of creating a rounded "nose cone" on the front edge which I hoped would help but I'm not sure if it made much (if any) difference.
FollowupID:
825500
Follow Up By: Member - Scott M (NSW) - Friday, Oct 03, 2014 at 16:44
Friday, Oct 03, 2014 at 16:44
Tim, the old troopie with the Open Sky had a similar streamline to a government bus :-)
troopie roof top
The new set up with the Maggioline is more streamlined (relatively)
Maggi down
What it looks like up (at Durba Springs)
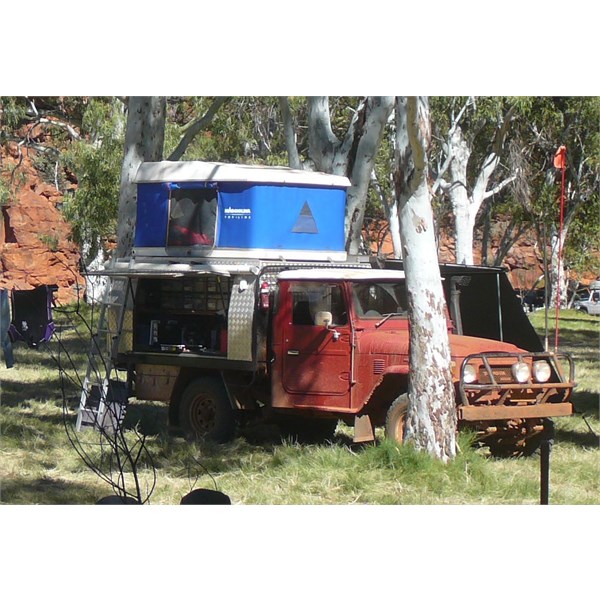
Maggi Up
FollowupID:
825501
Follow Up By: Member - Scott M (NSW) - Friday, Oct 03, 2014 at 16:49
Friday, Oct 03, 2014 at 16:49
Shot of old set up packed away
packed away
FollowupID:
825502
Follow Up By: Member - Scott M (NSW) - Friday, Oct 03, 2014 at 23:47
Friday, Oct 03, 2014 at 23:47
This shot here gives you an idea of what you can do for extra cover. Notice the sail track along the long edge and the angle bracket with an eyelet on the end. all you need is good quality rip stop with sail cord on one edge and a loose loop on the other edge. Run a pole with eyelets through
the loop and all you need is two poles with spigots for each end to extend the awning oput. Takes all of 2 minutes to set up and a similar time to take down. Just make sure you run the canvas though the sail-track before you erect the
tent (easier to reach).
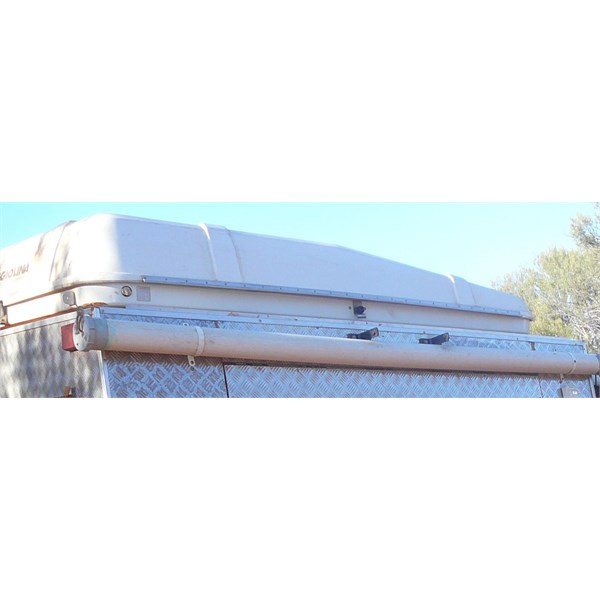
awning set up
FollowupID:
825515
Follow Up By: AlbyNSW - Saturday, Oct 04, 2014 at 05:32
Saturday, Oct 04, 2014 at 05:32
Nice setup Scott
I don't quite follow what you mean with the angle bracket in the centre with the eyelet stay on it , are you attaching a spreader bar to it?
FollowupID:
825516
Follow Up By: Member - Scott M (NSW) - Saturday, Oct 04, 2014 at 10:41
Saturday, Oct 04, 2014 at 10:41
Alby, thanks - yes the spreader bar runs lengthwise though
the loop in the canvas - just stiched under along the length.
You look at the end of the
tent base (just above the blinker on the canopy) and there's two (or four for both sides) angle peices with an eyelet hole in it. Just put the extender bars (with spigots on both ends) in that and into the eyelet of the spreader bar - extend and lock - all set up !
Quite simple really.
This shot here shows them on both sides of the base...
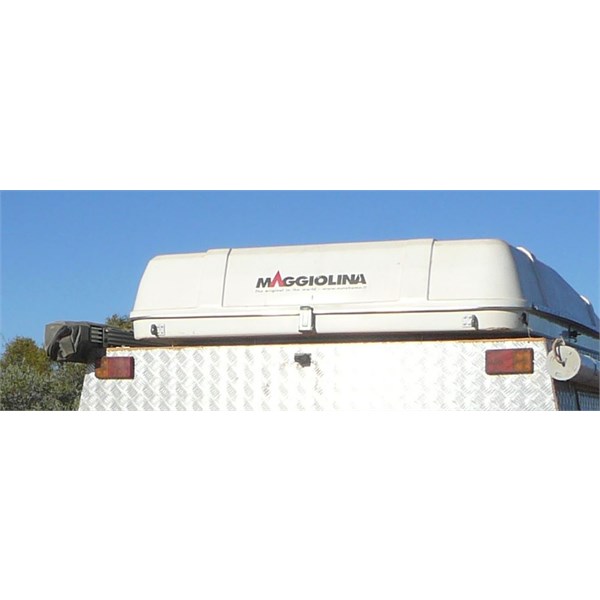
maggi
FollowupID:
825542
Follow Up By: AlbyNSW - Saturday, Oct 04, 2014 at 19:45
Saturday, Oct 04, 2014 at 19:45
Ok got it now, I was looking at the two brackets in the centre above your pvc tube and it was getting me confused. I gather that they are there to support your ladder
Great idea and nice and simple
Cheers
FollowupID:
825571