11th April 2018
Hi ExplorOz Reader,
This newsletter is specifically related to the ExplorOz Traveller app. In this edition, we take a look in more detail at using the navigation tools - from the basics, through to making your own Private Treks. For some of you, this information may seem too simplistic - but for others, this might just be the type of instruction you needed. We hope that either way, you'll find something useful. Please feel welcome to send through suggestions for other topics you'd like us to cover in future editions.
MAP OVERVIEWWhen you first launch the map in the app, you might find that it is zoomed out a very long way. That's ok - just press the the zoom tools (+/-), or use the roller wheel on your mouse (if you have the Windows version), or pinch zoom with your fingers to increase the size of the map in the window.
A few quick things to notice: - When you launch the map it will always default back to show the last map you used
- Coloured dots with numbers on the map are "clusters" of Places. The numbers refer to how many Places in that cluster. Click dots to expand - this will auto-zoom that area. Once a cluster is fully expanded, individual Places are indicated with a symbol to indicate what type of Place it is. (See Legend in the Help/Instructions).
- If you click any Place symbol on the map, a pop-up box will appear showing the name of the Place, its distance from you, and 2 blue buttons (Show | Go To).
- Pressing the GoTo button will immediately launch the navigation control panel and this Place will be automatically added. If you want driving directions to that place from where you are now, just click the green Navigation button. The system will attempt to provide driving directions, which you can cancel or accept. NOTE: if the route is not as desired, you can insert additional Places to re-steer the route. To do this, press cancel instead of accept and then select more Places along the route you wish to go (click the Go To button to add/insert each additional Place to the nav plan). Once you have more than 1 Place in your nav plan, the 1st Place becomes the start point and only a straight line is given from your current position to this start point. This allows you to build Trek plans with nominated start points ignoring your home etc.
- Once a nav plan has been started, a 2nd symbol will appear under the map layer icon - it will show the mode of travel with a symbol (Driving, Cycling, Straight, Walking). Click this symbol to open the nav plan control panel.

USING NAVIGATION CONTROLSTo start navigation, you simply have to tell the app that you want to
"GoTo" a Place. All navigation segments in the app are built around
Place to Place movements. You can use any of the existing Places
shown on the map, or in the Places list, or you can create a New Place. Once you've used the GoTo to select Places to add to your Nav Plan, here's how you find and use the control tools.
- At the bottom of the nav control panel are 4 important tools -
Delete, Reorder, Save, Clear Nav.
- If you've been experimenting and want to clear out what you've done and reset the app to standard operation you need to end navigation. You need to open the nav control panel and click Clear Nav. See example below:-
- To DELETE or REORDER Places in your nav plan you will need to use the tools at the very bottom of the nav plan control pane. First click the option to activate the tool - then you can perform the action by selecting which Place you want to modify, and then you need to deactivate the tool by clicking the tool again.
- In the example below, I've clicked DELETE to bring up the red options alongside each Place in my nav plan. If I wish to delete one of these I can now click the red - symbol shown alongside that Place Name. To finish, I must press the Delete option button again at the bottom of the control panel. Think of it as a toggle switch - press to activate the control - select the item - press to deactivate the control.
- The REORDER option works in much the same way, except that after activating the Reorder control, you can click/drag/drop the Places around in your nav plan to reorder them. The reorder symbol will appear on the right side and is indicated with 3 horizontal bars. See example below:-
TIPS:
- as you press each Place in the Nav Plan, it will be highlighted on the map. This helps verify the location of places in your list.
- each segment in your nav plan will show the icon for the mode of travel used to calculate the driving directions. If you see a Vehicle that means the navigator has been able to accurately obtain routable driving details and you'll see actual driving distance & driving time from the previous place to this place. However, if you see the aeroplane symbol this means the navigator cannot obtain routable driving details for this segment and has provided straight line information.
- You can manually change the mode of travel for each travel segment - just click on the Place in your plan, then go up to the top of the panel and change the mode using the drop down list (cycling, driving, walking, straight).
- If you find the navigator cannot obtaining routable driving details in driving mode for one Place to the next, you can try using cycling or walking, otherwise use Straight line.
- The driving directions tool will only be able to calculate actual road routes when you have an internet connection, however if you build your nav plans before you go you can save these. Your saved nav plans are called Private Treks. The next section discusses how to use Private Treks.
PRIVATE TREKS
Private Treks are nav plans that you make and save to use later. These are best made when you have an internet connection to utilise the driving directions tools, which enables you to get actual turn-by-turn guidance and routes that follow the path of the road. When these are saved, all the routing is stored offline in your profile so you can use these when you're out in the bush without an internet connection and they will still provide you with active turn-by-turn guidance exactly as you built it.
To begin, you firstly create a nav plan as described above. Note that when you have more than 1 Place in your nav plan the first place is stored/saved as the start point. However, when you view your Nav Plan or Trek there will always be a straight line (and active guidance) to get you from your current position to the start point. This allows you to open the saved Private Trek from anywhere at any time and the navigator will guide you to the saved start point.
In the example below, I created this plan whilst sitting in my office in Perth yet you cannot see any indication of that. I have added 3 Places to my nav plan: Merredin, Kellerberrin, and Bindoon. Driving details are given from the first Place (Merredin) to the next Place (Kellerberrin). In this screen I have not yet pressed SAVE.

After pressing SAVE, the following window will pop-up.
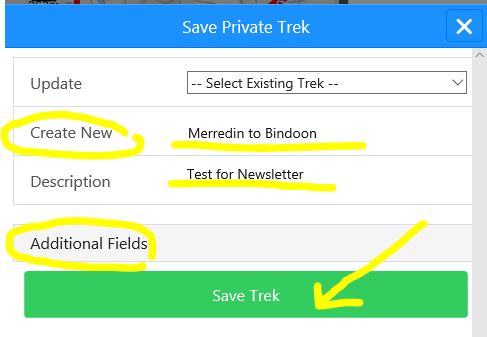 I have typed "Merredin to Bindoon" in the Create New box, as well as a description. You can add extra details in the Additional Fields, but the fastest thing is to simply click SAVE TREK. Another window will then appear looking just like the information panel of any other Trek. Note the options panel at the bottom allows you to toggle through to see other information stored for this Trek - Map & Directions will be the most important. To locate the saved trek again, simply press Treks List from the home screen Resources. This will show you ExplorOz Treks in order of what's closest to you. But to get to your Private Treks refer to the grey options panel at the bottom - and click Private. Finally, to load a saved Private Trek into your navigator you need to select it from the Private Trek list, then press GoTo. To commence navigation you must press the green Navigation button shown in the Nav control panel. Note that voice guidance is optional - refer to app Settings to adjust. TIPS- If you wish to edit a saved Private Trek, firstly select GoTo to get the details into your nav plan. Make changes to the Places (delete, reorder, add etc). Then when you save, you will use the pull-down options in the Update (Select Existing Trek) to find your named trek and it will update/overwrite your Trek with the new details.
- Be careful using the blue edit button shown in the Information panel of your Private Treks - this is just for editting the name and description. People who have duplicate copies of the same trek may find they have been mis-using this option as it will automatically default to creating a new trek with the same name if you accept the defaults in this screen.
WAS THIS USEFUL?Please let us know if you would like us to prepare other newsletters with detailed instructions like this. And of course, feel welcome to send through suggestions for other topics you'd like us to cover.
PLEASE REVIEW THE APP
Whilst we are very happy with the average review rating we receive, we would like to see more people take the time to leave us a review as these are so important to helping other people decide if they should purchase the app.
This is not a free app, and whilst there's a lot of people that have known and trusted the ExplorOz brand for many years, we also want to ensure that newcomers find our app in the store and feel confident that they are getting something worthwhile. For that reason, all we ask is for you to leave a simple honest comment. It doesn't have to be lengthy or detailed. For a lot of people buying apps they just want confirmation that it will download successfully and that they aren't being ripped off. People reading these reviews cannot contact you or bother you, but they will greatly appreciate hearing first-hand about what you like/don't like in the app.
Your ratings, but more especially your reviews also affect how the app store will display the app. Having more reviews will ensure the app is easy to find, which helps us get more installs.
If you'd like to leave a review without waiting for the app to prompt you, just visit the app page in the app store where you bought it and open the description, scroll down and you should be able to view all the posted reviews and find a link to leave your own review.
Many thanks
David & Michelle Martin
I.T. Beyond Pty Ltd.
Owner/Developer of the ExplorOz website and ExplorOz Traveller app
|