Electric brake problem
Submitted: Tuesday, Jun 12, 2018 at 10:57
ThreadID:
136821
Views:
12377
Replies:
7
FollowUps:
9
This Thread has been Archived
Member - nick b boab
Brake drum
Break

New hub
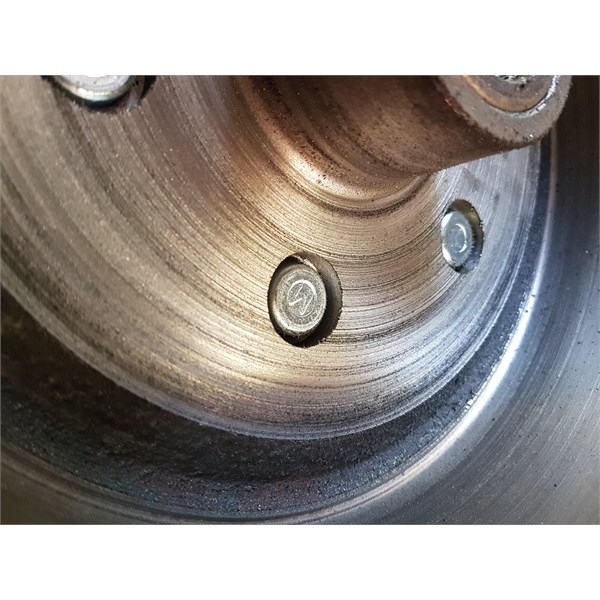
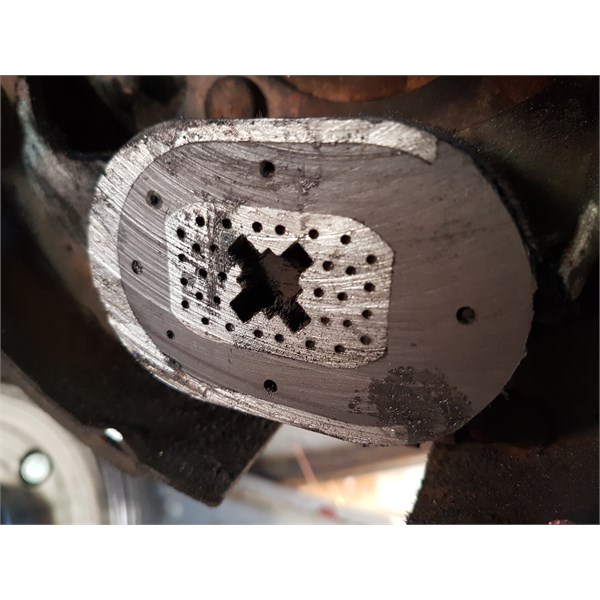
Have just replaced my 10 inch electric brake drums on campervan and as photos indicate looks like a major problem . wondering if any of the brake experts could enlighten me on what the problem maybe.
Does appear that The internal hub earring holder may be a bit shorter than the one I have taken off also the brakes do not work hardly at all even on full power .
And this drum is intermittently locking up and will not release until I reverse slightly
Any thoughts
Reply By: HKB Electronics - Tuesday, Jun 12, 2018 at 11:10
Tuesday, Jun 12, 2018 at 11:10
Looks like
mine do after around 30000km of dusty roads. Poor braking wise, I just replaced the magnets on my unit, the wires coming out the magnet assembly were starting to fray and though they still tested with continuity weren't apply any real braking.
Drum locking up, friend on a trip couple of years back replaced complete backing plates and drums before the trip, tested ok around home, on the road he found one was heating up. Backed of brake shoe tested ok. After a few goes of backing of the shoes replaced the bearing, again tested ok. Yep down the track heated up again, this time cut the wires to the magnet still didn't solve the issue, everything looked fined, could not work out why the brake would start dragging. Ended up having to take out the brake shoes for the trip. While all this was going on a brake mob also checked it out and couldn't see any problems. When he got home he replaced the backing plate, shoes and magnet again and that cured the problem.
AnswerID:
619485
Reply By: 9900Eagle - Tuesday, Jun 12, 2018 at 12:23
Tuesday, Jun 12, 2018 at 12:23
Wear on the brake drum and magnet seems normal to me. I had one brake locking up and overheating after many k's, fitted a new magnet and the problem went away, but the old magnet looked fine.
Sometimes the manufacturer will route the brake wires to one brake and then across to the other one, this can cause problems with different voltages to each brake.
AnswerID:
619489
Reply By: RMD - Tuesday, Jun 12, 2018 at 12:33
Tuesday, Jun 12, 2018 at 12:33
The face of the drum where the magnet runs looks normal to me and the brake magnets aren't worn out either, because the dimples are still quite deep.
Perhaps the brake performance is because the wiring to the magnets isn't allowing proper current flow or even the controller isn't set to drive it hard enough although you think it is doing the job.
A normal globe of around 30 watts connected to the brake pin and the earth wire pin should see the globe increase in brilliance as the manual control is progressively applied. That ensures the system is really able to work and meter out energy to the brake magnets as required. Just because people apply 12v to the brake magnet wire of the trailer doesn't necessarily mean the system is all working as a complete unit. The trailer end might check out ok but the front section could be the problem.
The van brakes should be able to easily do more then the van weight and make braking distance shorter than just the vehicle alone can do.
If the brake intermittenly locks up it is nearly always because the adjustment is TOO slack and the
servo action of the brake design suddenly wraps the shoes ON and they hang on until the direction of rotation is reversed. Proper close adjustment should see the brakes work correctly. They are designed to do that, not suddenly get hammered wedge like, onto the drums with the shoes initially out of their best working position.
People are trained from birth to think a grabbing brake is adjusted too tight, not so. Too tightly adjusted is dragging the shoes.
Adjust brakes to firmly lock the drum from rotating and then reverse the adjustment wheel until free running is achieved. The shoes must be seated by "full locking", to position them prior to backing it off so they sit and work properly.
On a recent trip a mate with LC and 2 axle van had a wheel locking, I adjusted the brake to be closer, as above, and the problem disappeared.
I would get rid of the grease cap shown and fit a new one, instead of one which looks like it has been 9 rounds with Jeff Horn the boxer. Lose it and you have bearing problems quite soon.
AnswerID:
619492
Follow Up By: Gronk - Tuesday, Jun 12, 2018 at 18:36
Tuesday, Jun 12, 2018 at 18:36
The old saying of adjust it up until resistance is felt then back off 7 clicks is the correct way !!
I thought it was the wrong way, and when adjusted up near tight, the performance of the brakes wasn't near as good as the "correct" way.
Took the drum off and watched the lever action of the actuator, and noticed if they are adjusted up too much, only the leading edge of the pad makes contact. Adjust it off 7 clicks and the whole pad makes even contact with the drum..
Obviously, go too far and back it off too much and it does the opposite !!
FollowupID:
891788
Follow Up By: Shaker - Tuesday, Jun 12, 2018 at 20:51
Tuesday, Jun 12, 2018 at 20:51
This from the Al-ko electric brakes manual .......
1. Brake Adjustment Procedure
The brakes fitted to an axle or independent rubber
suspension system supplied by AL-KO International are adjusted prior to supply. A brake clean and adjustment should be carried out between the first 300 to 1000 kilometres and then at the service intervals recommended on Page 8. Located in the back of the brake backing plate is a small opening covered by a protective plug. With the trailer
wheels off the ground, rotation of the star wheel, (as shown in the diagram below), will result in correct brake adjustment. With a screw driver rotate the star wheel until the brake drag makes it difficult to turn the wheel. The star wheel can then be turned in the opposite direction to allow the trailer wheel to turn 3/4 to 1 revolution freely when spun.
FollowupID:
891793
Follow Up By: RMD - Tuesday, Jun 12, 2018 at 23:08
Tuesday, Jun 12, 2018 at 23:08
Gronk
What you mentioned about the leading edge of the shoe doesn'tmake sense to me.
The whole brake assembly is a floating item and it self centres the shoes when the arm moves. They cannot remain with just the leading edge doing the braking because that edge drives the whole assembly into the" wrap on
servo action" which is the whole idea of the design.
If only one section of a shoe remained in harder contact than other areas, just that small section would be evaporated quickly down to steel shoe level.
What is observed with drum OFF is not what happens with braking with drum ON.
FollowupID:
891796
Follow Up By: Gronk - Wednesday, Jun 13, 2018 at 06:50
Wednesday, Jun 13, 2018 at 06:50
Mate, if it wasn't the leading edge, it may have been the trailing edge. It isn't just the edge, but more like only a 1/4 or 1/2 the shoe being used.
Next time you have a drum off, observe the initial action of the mechanism.
And it's why the VC vid says to back off 5 to 8 clicks.
FollowupID:
891800
Follow Up By: Shaker - Wednesday, Jun 13, 2018 at 09:42
Wednesday, Jun 13, 2018 at 09:42
It might be because nobody seems to radius grind brake shoes any more. We always used to take the drums & old shoes to a brake service & they would bond the shoes & then radius grind them to match the drums.
FollowupID:
891805
Follow Up By: Member - nick b boab - Wednesday, Jun 13, 2018 at 19:56
Wednesday, Jun 13, 2018 at 19:56
haha RMD : those grease caps have done a few round , got some newies to go on
they look a little worse in photo than they are .... cheers for your help
FollowupID:
891817
Reply By: Gary T7 - Tuesday, Jun 12, 2018 at 12:43
Tuesday, Jun 12, 2018 at 12:43
Classic under adjustment of the shoes with the severity of the electric brake controller set to high .That's why you have to back up to release the shoe that is jammed on .
As the brake is applied the shoes are forced out too severely with the under adjustment of the shoes they jam at the leading edge of the shoe. (All of the surface of the shoe should make contact with the drum) backing off shoes makes it worse .
Fix - adjust shoes up so they are just skimming the drum .make sure the handbrake is adjusted right off first ( most people only adjust handbrakes by cable this is wrong ) it holds the shoes out in the incorrect position for correct adjustment. Back off the cable and make sure handbrake lever at the rear of the backing plate is right off and adjust shoes first ,then cable adjustment.
Adjustment of brake controller -There should be two different setting on the brake controller. .Back off the severity (How quickly and hard they come on ) of the brake controller (Set too high) and then increase the pressure setting if needed after test run .This allows the brake to be applied in a controlled manner with the full surface of the shoes making full contact.
Follow this procedure and you won't have any more problem with brakes jamming
I have fixed many van brakes .
AnswerID:
619494
Follow Up By: Member - nick b boab - Tuesday, Jun 12, 2018 at 13:12
Tuesday, Jun 12, 2018 at 13:12
Thanks Gary will do at next opportunity...few day
Sounds like you're done this before cheers thanks to the others who have also replied to date
FollowupID:
891784
Follow Up By: Shaker - Tuesday, Jun 12, 2018 at 15:58
Tuesday, Jun 12, 2018 at 15:58
If you have had the drums off, make sure that you adjust the shoes until the wheel locks up, this will centre the shoes, then back them off until the wheel just spins freely.
FollowupID:
891785
Reply By: swampy - Tuesday, Jun 12, 2018 at 16:28
Tuesday, Jun 12, 2018 at 16:28
HI
brake magnets look normal
When u cannot see dimples throw out
When uneven wear throw out
Drum magnet area looks like normal wear and tare
When badly grooved throw out
When worn flush with back of studs throw out
Always adjust brake linnings with some/little consistant drag . Do from rear with flat screw driver . NEVER EVER back off .
Backed off brake can lock up
Why by the time it actuator arm moves thru the its range of motion brakes do not apply till late in its travel . THIS WILL CAUSE sudden aggressive brake lock up .
ALWAYS when servicing linnings emery tape linnings and drum surfaces .
This will ensure smooth braking also.
Brake service is easy IF DONE PROPERLY
Always service bearings regular common sense
AnswerID:
619497
Reply By: Athol W1 - Tuesday, Jun 12, 2018 at 21:18
Tuesday, Jun 12, 2018 at 21:18
Nick
In addition to all that has been said about adjustment etc do not overlook an out of round brake drum.
One van that I had one wheel constantly locked every time the brakes were applied and stayed locked, just as per your issues. I eventually cut the wires to that wheel so that I could continue the trip and on my return home had all drums machined even though they all looked good and measured up OK, no more trouble.
Regards
Athol
AnswerID:
619508
Reply By: Member - nick b boab - Wednesday, Jun 13, 2018 at 19:49
Wednesday, Jun 13, 2018 at 19:49
Okay thanks everyone for your help here ....
have now adjusted brakes and they are a lot better , no lock up so far .
They don't appear to be at there best but may need to bed in ??
cheers everyone
AnswerID:
619534