HMAS Sydney, named after the Australian city of
Sydney, was one of three modified Leander-class light cruisers operated by the Royal Australian Navy (RAN). Ordered for the Royal Navy as HMS Phaeton, the cruiser was purchased by the Australian government and renamed prior to her 1934 launch.
During the early part of her operational history,
Sydney helped enforce sanctions during the Abyssinian crisis, and at the start of World War II was assigned to convoy escort and patrol duties in Australian waters. In May 1940,
Sydney joined the British Mediterranean Fleet for an eight-month deployment, during which she sank two Italian warships, participated in multiple shore bombardments, and provided support to the
Malta Convoys, while receiving minimal damage and no casualties. On her return to Australia in February 1941,
Sydney resumed convoy escort and patrol duties in home waters.
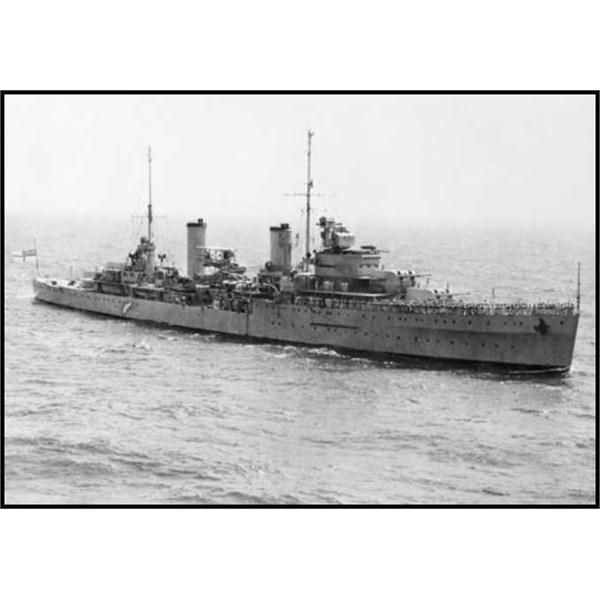
HMAS Sydney underway in 1940
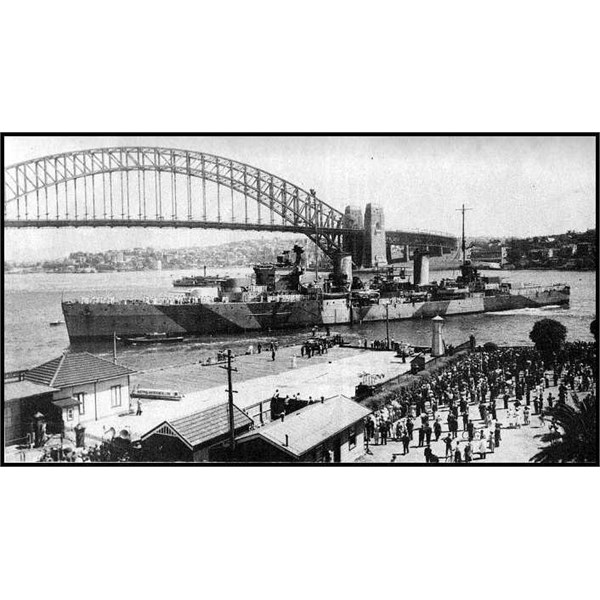
Sydney manoeuvring to come alongside at Sydney Cove on 10 February 1941
On 19 November 1941,
Sydney was involved in a mutually destructive engagement with the German auxiliary cruiser Kormoran, and was lost with all 645 aboard. The wrecks of both ships were lost until 2008;
Sydney was found on 17 March, five days after her adversary.
Sydney's defeat is commonly attributed to the proximity of the two ships during the engagement, and Kormoran's advantages of surprise and rapid, accurate fire. However, the cruiser's loss with all hands compared to the survival of most of the German crew have resulted in controversy, with some alleging that the German commander used illegal ruses to lure
Sydney into range, that a Japanese submarine was involved, and that the true events of the battle are concealed behind a wide-ranging cover up.
The ship was laid down by Swan Hunter & Wigham Richardson at Wallsend-on-Tyne, England, on 8 July 1933 for the Royal Navy as HMS Phaeton, named after the Greek mythological figure. However, in 1934, the Australian government was seeking a replacement for the light cruiser HMAS
Brisbane, and negotiated to purchase Phaeton while she was still under construction. The cruiser was renamed after the capital city of New South Wales, and was launched on 22 September 1934 by the wife of
Stanley Bruce, former Prime Minister of Australia and the serving Australian High Commissioner to the
United Kingdom.
Sydney was commissioned into the RAN on 24 September 1935, drawing her ship's company from
Brisbane, which had been decommissioned earlier that day.
Following the announcement that Australia was purchasing a British-built cruiser, there was criticism, primarily from the Opposition of the day, stating that such a warship should be built using Australian resources and labour. Several reasons were given in reply for acquiring British-built cruisers instead of Australian-made: the ship was already close to completion, the pending threat of war meant that there was not enough time to train Australians in the necessary skills, and that of the two cruisers built in Australian shipyards, one (HMAS
Adelaide) had taken seven years to complete.
Following the declaration of war,
Sydney was instructed to carry out patrol and escort duties in Australian waters. Captain John Collins took over command of
Sydney on 16 November. On 28 November,
Sydney joined the Australian heavy cruisers Australia and
Canberra in an unsuccessful four-day search for the German pocket battleship Admiral Graf Spee, which was known to be operating in the Indian Ocean.
Sydney was relieved by HMAS
Adelaide on 13 December, and sailed to
Cockatoo Island in
Sydney for a maintenance docking. The work was completed in late January 1940, and as a shakedown cruise
Sydney joined
Canberra and the British ships Leander and Ramillies in escorting the Suez-bound Anzac convoy US 1;
Sydney broke off after the convoy left the east coast of Australia and returned to
Sydney. Returning to
Fremantle on 6 February,
Sydney relieved Australia as the cruiser responsible for patrol and escort duties on the west coast.
On 19 April,
Sydney joined the escort of Anzac convoy US 2 off
Albany, and remained with the convoy until it reached the Cocos Island on 28 April and was replaced by French cruiser Suffren. The Australian cruiser set course for
Fremantle, but on 1 May was assigned to the East Indies Station and rerouted to Colombo, where she arrived on 8 May. Arriving in Colombo on 8 May,
Sydney was immediately tasked with meeting Anzac convoy US 3 off the Cocos Islands and escorting it across the Indian Ocean. The cruiser departed on 12 May, but while en route, she was instructed to make for the Mediterranean. Arriving back in Colombo on 18 May,
Sydney replenished before sailing at high speed to Aden, where she arrived four days later. The Australian cruiser, accompanied by HM Ships
Gloucester and Eagle, departed the next day, with the ships crossing the Suez Canal during the night of 25–26 May, and arriving in Alexandria that afternoon at 15:30.
Sydney was originally marked for operations in the Red Sea, but after observing the performance of an Australian five-destroyer flotilla assigned to the British Mediterranean Fleet, Admiral Andrew Cunningham decided to "keep the Australian cruiser for himself" and attached
Sydney to the Royal Navy's 7th Cruiser Squadron.
On the afternoon of 19 November 1941,
Sydney was off the coast of Western Australia, near
Carnarvon, and heading south towards
Fremantle. Around 15:55, the cruiser spotted a merchant ship on a northbound course, which quickly turned away from the coast at 14 knots .
Sydney increased speed to 25 knots and made to intercept. As she closed
the gap,
Sydney began to signal the unidentified merchantman, first by signal light, then after no reply was forthcoming and the distance between the two ships had decreased, by a combination of light and signal flag. The merchant ship hoisted her callsign, but as she was ahead and just port of
Sydney, the flags were obscured by the funnel. A request from the cruiser that the merchant ship make her signal letters clear, which the signals officer did by lengthening the halyard and swinging the flags clear. The callsign was that of the Dutch ship Straat Malakka, but she was not on
Sydney's list of ships meant to be in the area. Further flag signals were exchanged between the ships, with
Sydney asking the Dutch ship's destination and cargo.
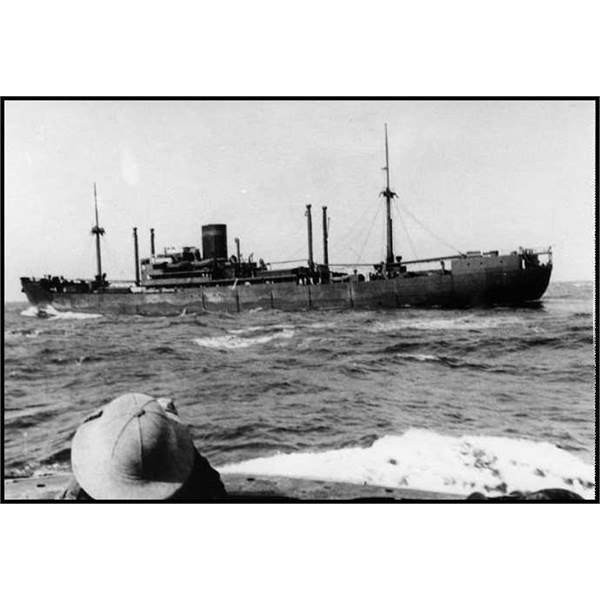
The auxiliary cruiser Kormoran in 1940
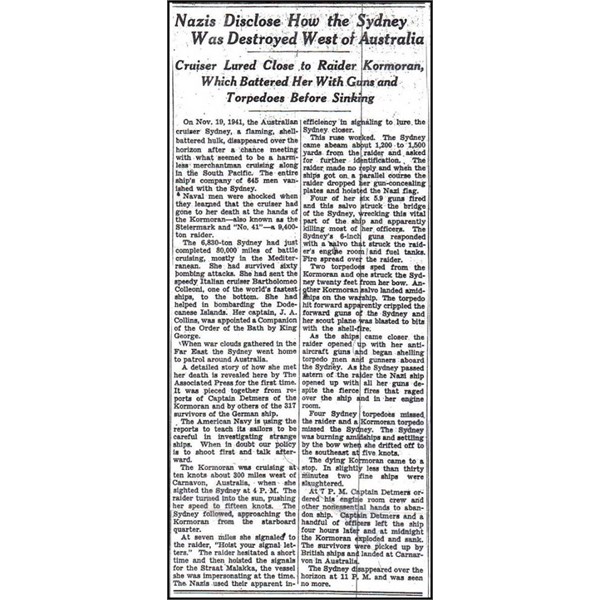
HMAS Sydney - New York Times, March 2nd 1943
At 17:00, a distress signal was transmitted by Straat Malakka, indicating that she was being pursued by a merchant raider. Following this,
Sydney pulled alongside the merchant ship from astern; pacing the merchantman on a parallel course, approximately 1,300 metres (4,300 ft) away.
Sydney's main guns and port torpedo launcher were trained on the ship, while she sent the interior portion of Straat Malakka's secret callsign. Fifteen minutes later, at around 17:30, the merchantman had not replied, and
Sydney sent a signal ordering her to show the secret callsign.
Straat Malakka had not replied because she was the German auxiliary cruiser Kormoran in disguise, and when asked to reveal a callsign the Germans did not know, they responded by decamouflaging and opened fire. Prompted by the raider's unveiling,
Sydney also fired (accounts are divided as to which ship fired first), but while her first salvo either missed or passed through Kormoran's upper superstructure with minimal damage, four of the raider's six 5.9-inch (150 mm) guns (the other two guns were on the port side and could not fire to starboard) were able to destroy the cruiser's bridge and gun director tower, damage the forward turrets, and set the aircraft on fire.
Sydney did not fire again until after the raider's sixth salvo: "Y" turret fired without effect, but "X" turret was able to put multiple shells into Kormoran, damaging machinery spaces and one of the raider's guns, while igniting an oil
tank. During this, Kormoran maintained heavy fire, and around the time of the eighth or ninth German salvo, a torpedo launched at the start of the engagement hit
Sydney just forward of "A" turret and near the ASDIC compartment (the weakest point on the ship's hull), ripping a hole in the side and causing the bow of the cruiser to angle down. Down by the bows, the cruiser swung hard to port, and passed behind Kormoran; during the turn, shells from the raider knocked "B" turret off
Sydney.
By 17:35,
Sydney was heading south and losing speed, wreathed in smoke from multiple fires. Her main armament was disabled (the two aft turrets had jammed on a port facing and could not be swung around), and her secondary guns were out of effective range. The cruiser continued to be hit by shells from Kormoran's aft guns as the distance between the ships increased. The Germans reported that around 17:45, all four torpedoes from
Sydney's starboard launcher were fired, but as Kormoran was manoeuvring to bring her port broadside to bear, they all missed. In fact, only two torpedoes from
Sydney's port launcher were ever fired, which must have happened some time earlier. The raider's engines broke down after this turn, but she continued to fire on
Sydney at a high rate despite being immobilised, although many of the shells would have missed as the distance between the two ships increased. Kormoran ceased fire at 17:50, with the range at 6,600 yards (6,000 m), and launched another torpedo at 18:00, but missed
Sydney.
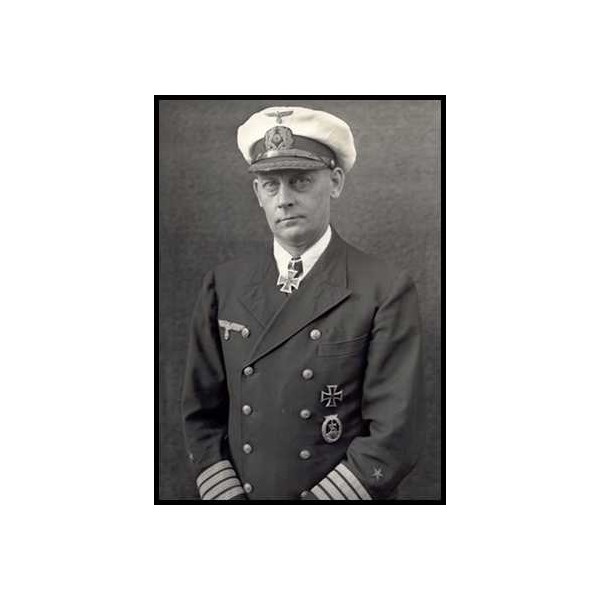
Fregattenkapitan Theodore Detmers
The Australian cruiser continued on a south-south-east heading at low speed; observers aboard Kormoran doubted that
Sydney was under control. Although disappearing over the horizon shortly later, the glow from the damaged, burning warship was consistently seen by the Germans until about 22:00, and sporadically until midnight. At some point during the night,
Sydney lost buoyancy and sank: the bow was torn off as she submerged and descended almost vertically, while the rest of the hull glided 500 metres (1,600 ft) forward as she sank, hitting the bottom upright and stern first.
Sydney's shells had crippled Kormoran; the German crew abandoned ship after it was determined that below-deck fires could not be controlled before they reached the gun magazines or the mines in the cargo hold. The raider was scuttled at midnight, and sank slowly until the
mine deck exploded half an hour later.
Sydney's failure to reach
Fremantle on 20 November was not initially cause for concern, as several factors might have delayed the cruiser, none of which were sufficient reason to break the order to maintain wireless silence. However, with no
sign of the cruiser by 23 November, shore-based wireless stations began transmitting orders for
Sydney to break silence and report in. A raft of German survivors was recovered by a British tanker on 24 November, at which point a large-scale air and sea search began. During this search, which lasted until the evening of 29 November 318 of Kormoran's 399 crew were found, but apart from a carley float and a lifebelt, nothing from
Sydney or the 645 aboard was recovered.
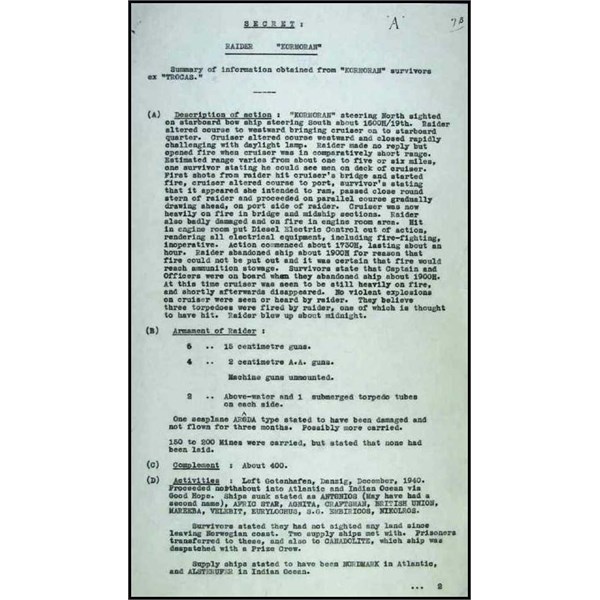
Description of Action
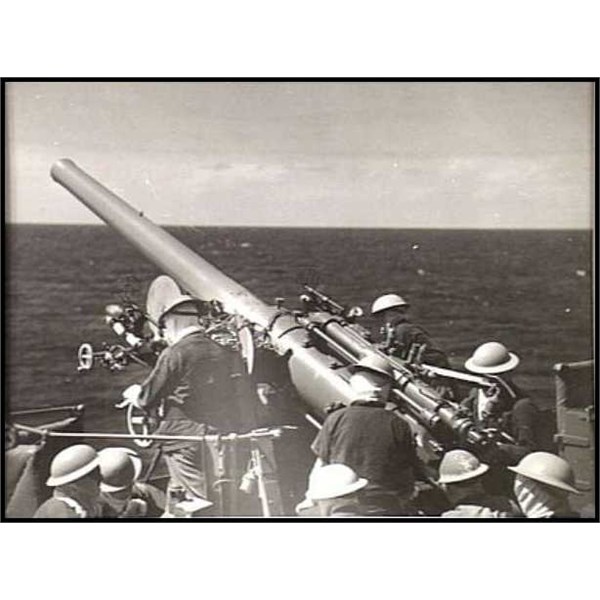
Sailors preparing to fire one of Sydney's 4-inch (100 mm) guns during a drill in February 1941
Australian Prime Minister John Curtin officially announced the loss of the cruiser during the afternoon of 30 November.
Sydney's destruction was a major blow to Australian morale and military capability: her ship's company made up 35% of the RAN's wartime casualties. The cruiser's loss did not have the same impact internationally; two British capital ships were destroyed during the same fortnight, and Japan entered World War II with attacks on Pearl Harbor and Singapore three weeks later.
The German survivors were taken to
Fremantle and interrogated. Attempts to learn what had happened were hampered by the German officers instructing their sailors to obfuscate the enemy with false answers, people describing events they did not witness but heard of later, and difficulty in keeping groups separated in order to check their stories against each other. Despite this, Australian authorities were able to piece together the broad details of the battle, which was verified by a group of German sailors who had been taken to
Sydney instead: their interviews showed the same commonalities and inconsistencies as those in
Fremantle, and the interrogators concluded that the true story was being recounted. Interrogations were concluded in December, and by the end of January, Kormoran's crew had been moved to prisoner-of-war camps in Victoria, where they remained until their repatriation to Germany in early 1947.
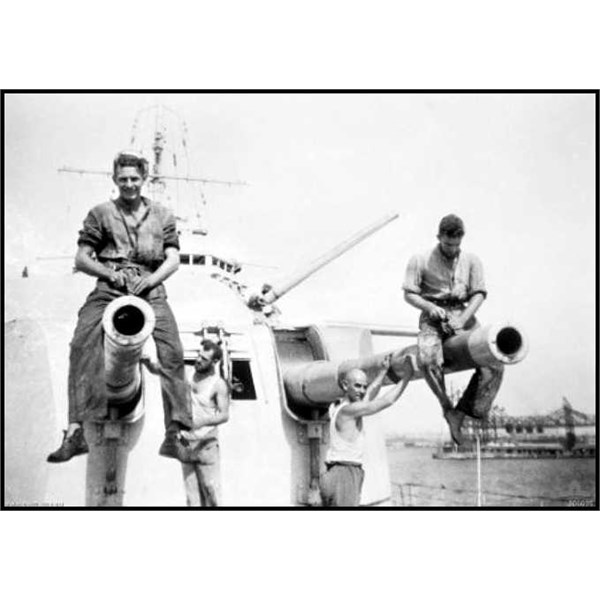
Sailors working on the 6-inch (150 mm) diameter barrels of ''A'' turret following the Battle of Cape Spada in 1940
Sydney's damaged ''A'' turret
On 6 February 1942, a Carley float containing a dead body was spotted just off Christmas Island and towed ashore. Examination of the raft and its occupant led the island's inhabitants to believe that they were from
Sydney. Although a 1949 investigation conducted by the Royal Navy stated the raft was not from
HMAS Sydney, and while some historians agreed, others concluded that the raft and the body originated from
Sydney. The body was exhumed in October 2006 and reburied at
Geraldton Cemetery in November 2008, after DNA was extracted. As of 2009, attempts to compare the DNA with relatives of
Sydney personnel had yet to identify the unknown sailor.
The battle between
Sydney and Kormoran is seen as controversial: the disbelief that a modified merchant ship could so successfully defeat a cruiser combined with the lack of Australian survivors led some to believe that the German account was false. Rumours that the battle was not what it seemed had been around since
Sydney failed to reach
Fremantle on schedule in 1941, but several historians (including Tom Frame and Wesley Olson) credit Michael Montgomery and his 1980 book Who Sank The
Sydney? with igniting the controversy.
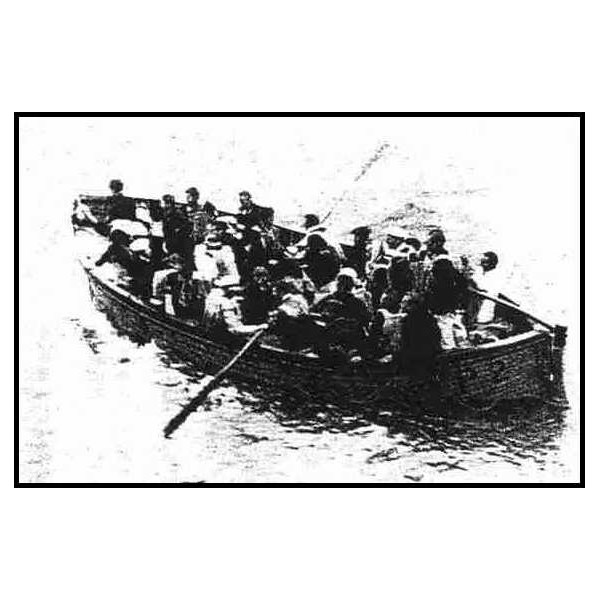
Survivors from the Kormoran in one of the ship's lifeboats
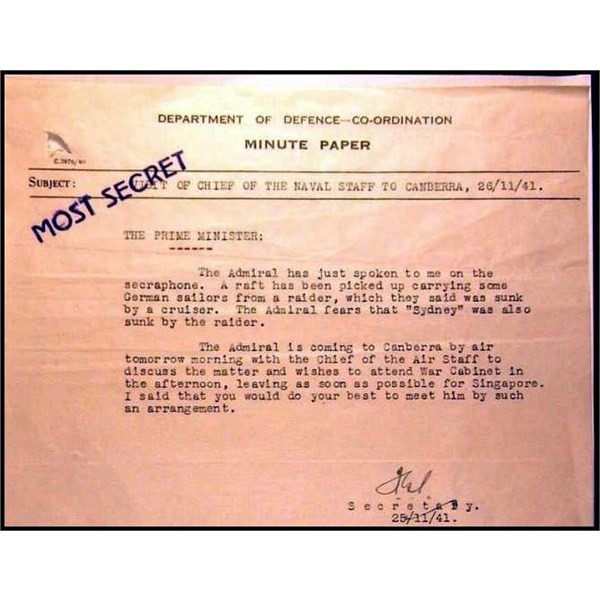
Memo from Frederick Shedden, Secretary to the War Cabinet, to Prime Minister John Curtin

HMAS Sydney War Memorial
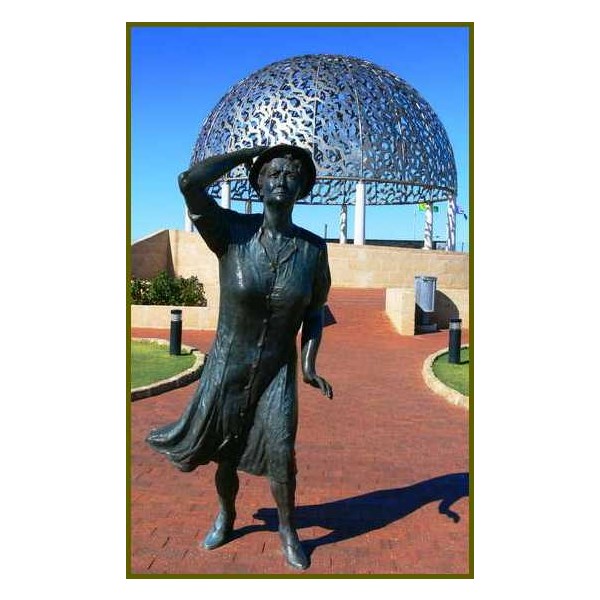
She looks to the horizon for her man to return
The main claims made by supporters of an alternative view of the engagement include: that the Germans fired on
Sydney before raising their battle ensign, or after using a flag of surrender or signals of distress to lure the cruiser in, that a Japanese submarine was partially or completely responsible for sinking
Sydney, that the involvement of the Japanese was covered up to lure the
United States into the war, and that Australian survivors were killed in the
water to eliminate witnesses. Other claims, less widely heard, include a belief that
Sydney was not at action stations and thus not prepared for Kormoran's attack, distress calls from the cruiser were heard by Australian shore facilities but ignored, and that survivors were captured then executed by the Japanese. These claims have been proven false by historians and researchers; the 1998 inquiry by the Joint Standing Committee for Foreign Affairs, Defence, and Trade concluded that the German accounts were a "feasible" interpretation of the battle, but there was no reliable evidence to support any of the alternative claims, while the 2009 report for the Cole Inquiry (the third volume of which was completely dedicated to the "frauds, conspiracies and speculations" surrounding the battle) found nothing to substantiate any of the theories raised.
In addition, most researchers have speculated as to why
Sydney was so close to an unknown vessel, with various levels of blame assigned to Captain Burnett for the demise of his ship. Theories to explain Burnett's actions include that he was inexperienced or incompetent, deceived by Kormoran's disguise, the idea that he was under conflicting orders instructing that raiders be attacked at range but enemy supply ships be captured, or that he was trying to clearly identify the merchantman
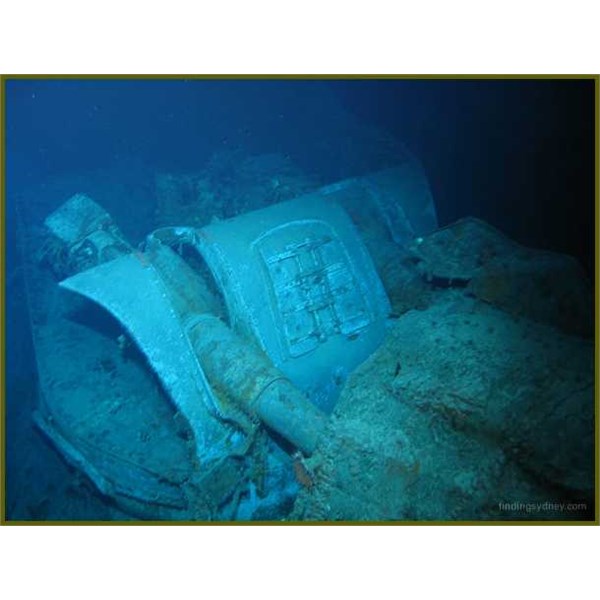
Sydney was located on 17 March 2008 just after 11:00, only hours after Kormoran's discovery was made public. News that the cruiser had been found was announced by Prime Minister Kevin Rudd on 18 March.
Sydney's wreck was located at 26°14'31?S 111°12'48?E at 2,468 metres (8,097 ft) below sea level, 11.4 nautical
miles (21.1 km; 13.1 mi) south-east of the raider. The bow of the cruiser had broken off as the ship sank, and was located at the opposite end of a
debris field stretching less than 500 metres (1,600 ft) north-west from the hull, which was sitting upright on the ocean floor. On discovery, both wrecks were placed under the protection of the Historic Shipwrecks Act 1976, which penalises anyone disturbing a protected shipwreck with a fine of up to A$10,000 or a maximum five years imprisonment. Both wrecks were placed on the Australian National
Heritage List on 14 March 2011
KORMORAN survivor Bill Elmecker
R.I.P. to all who were aboard MH17.
.