Hi guys, I finally joined the site as we have a planned trip around half of Australia in Feb 2017 and I just rigged up
my home made camper.
Our trip will take up down the East Coast, in to
Canberra, Thredbo and then inland to
Melbourne. From there along the coast to
Adelaide, up the middle to
Darwin,
Jabiru and back across to the East Coast. From there
Cairns, Whitsundays and down to
Brisbane. All up 60 days of paid leave. Crazy to think that the cost of the trip is offset by the savings in rent and child care alone.
I thought I would share some of my lessons learned and tips for anyone thinking of doing the same, this site was a great source of information for me when planning my trailer.
So a quick background on the scope:
• Tow car is a 2013 VE Commodore - 3lt SIDI Auto - light on torque but good on fuel
• Family of 3 - Me, my wife and our 3y/o son who will be almost 4 when we go.
• We looked at campers up to $17k but decided we would hold off until we upgraded our tow car to a 4WD at the end of the lease (salary packaging) due to the weight/fuel economy.
I decided to build my own camper for two reasons - to control the final weight and to have room to customise the camper. Plus, it will be great to look back at family pictures and my son see something I built for us/him.
Our minimum requirements list looked like this:
• Final unloaded weight be no more than 450kg
• Be off the ground away from snakes, ants, crocs etc.
• Fit the 3 of us comfortably
• Be large enough to store all our extra stuff (photography gear, drone, beach gear etc.)
• Have
solar power to recharge phones, run lights and a MacBook
• Come in at less than $3000 in materials
As you can see, it’s an ultra-conservative on road tourer with a few Gen Y comforts. As I am a photographer by night (literally - see Instagram @latitude_30.90s) having power to update social media and stock photography sites was essential. Given our tow car is a Commodore, we didn’t need to add specialised
suspension etc.
To keep things brief, this is what I purchased for the build:
• Custom made 6x4 trailer with 425mm sides and a rear builder’s rack. Painted with a spare wheel and jockey from Economy Trailers in
Boonah for $1250 inc 12 months rego
• G
Camp 1.8m wide roof top tent with tropical roof/fly for $899 on eBay
• 1.4m x 2m pull out awning – widest I could go given trailer width/road regulations for $129 on eBay
• Hardwood decking for custom trailer lid for $120
• Treated pine timber for rails (tent mounting) (free)
• 1150x450x500 tool box for $67
• 80w solar panel, 130AH battery/box (free)
• Wheel clamp, trailer lock, axel stands and chocks for $110
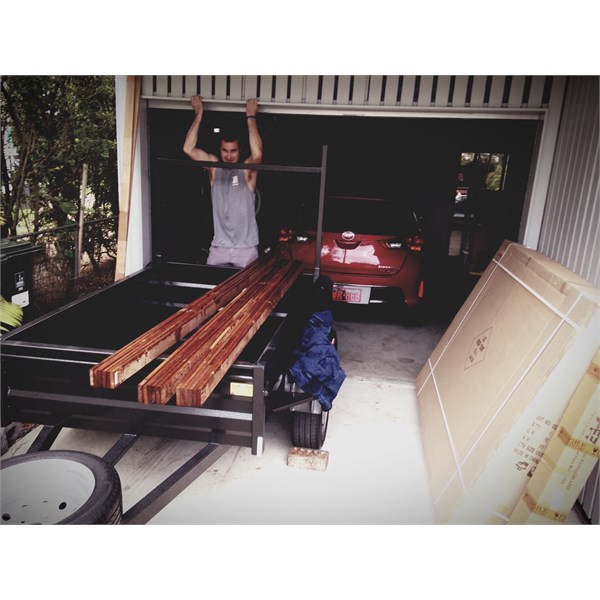
Making the lid
First thing I had to do was put a lid on the trailer. I thought about a lift up lid but decided to go with a timber hard lid sealed with silicon to keep the
water and dust out. Roof top tents are designed to be removable and mounted on racks, but knowing
mine was to be a permanent fixture I chose to run 5 treated timber rails and run 100mm screws through the metal based into the timber. It’s never coming off and has a good airflow underneath the tent base.
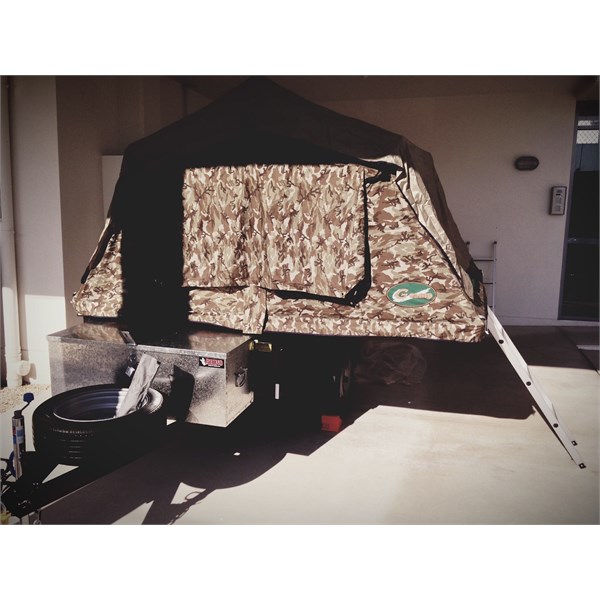
Fitting the tent
The original idea was to have a fold forward design over the draw bar but at 1.8m wide the tent was 150mm wider than the trailer which is 50mm too wide for regulations. So the design was modified to be a fold sideways design with the tent mounted 150mm forward from the rear builder’s rack which has the awning attached. 150mm allowed access to the side window but also meant there was an 80mm overhang at the front of the trailer – no big deal. The lid of the trailer was 1350mm with the base of the tent being 1200mm folded up. I chose to mount the tent to the edge of the lid so I would have 150mm under the folded out side to provide a little bit more structural support than just the ladder extension. It worked out better because with the tent folded out I have the underside of the overhanging base rigged with a clothes line to hang wet towels and swimmers off, also a cargo net for wet shoes to go into behind the ladder. The load will be slightly heavier on one side due to this positioning but have mounted the battery to offset this.
Lessons learned
• Marine plywood is 1200mm wide but the top of a 6x4 trailer is 1350mm wide – timber decking is cheaper and can be cut to size
• 425mm is not high enough for large iceboxes – but the 41lt versions fit nicely
• Drop down stabilisers are expensive – axel stands are $25 and do the same job
• QLD law states no part of your trailer can extend wider than the car. If inside these limits, no load can extend more than 100mm over the width of the trailer. So a 1.4m wide roof top tent could be set up to fold forward, but the larger 1.8m tent cannot. Solution is to get a 7x5 trailer – hindsight is a beautiful thing.
• The G
Camp tents are good quality, as good as tents I looked at for double the price. I did not expect this.
• The Masters closing down sale provides you with plenty of examples of why the franchise failed – poor range and still more expensive than other retailers even during the closing down fire sale. I ended up getting all my supplies from Bunnings who had everything I needed in 1 stop.
I will upload some better pictures if people are interested? I can take some of the tent set up with the window poles and awning set up in better light. I just bought my new camera for the trip so any excuse to fire off a few frames.
The total unloaded weight came to:
Trailer – 270kg
Tent – 70kg
Timber – 55kg
Awning – 12kg
Toolbox – 9kg
Total – 416kg
Total cost is sitting at just on $2800 for the trailer, and another $600 in
camping equipment / supplies.
If you have any questions or tips I am more than happy to listen/share my experiences remembering that this set up was custom to our exact needs at this moment in time, other people’s needs would vary such as off road ability etc.
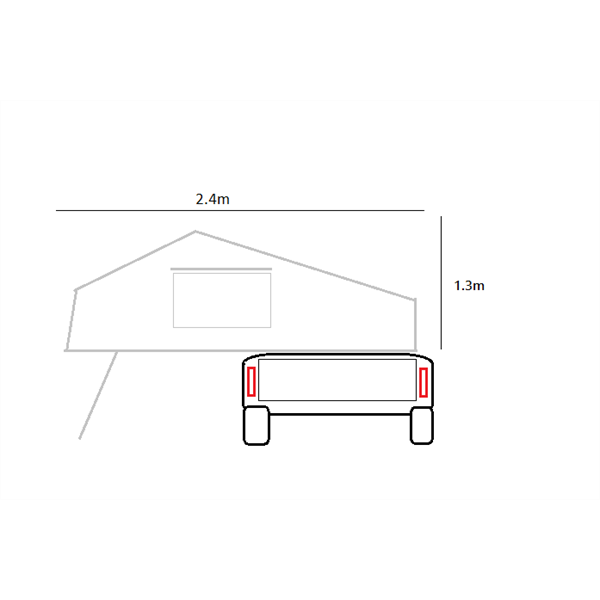
Plans

Lid
Trailer
Tent
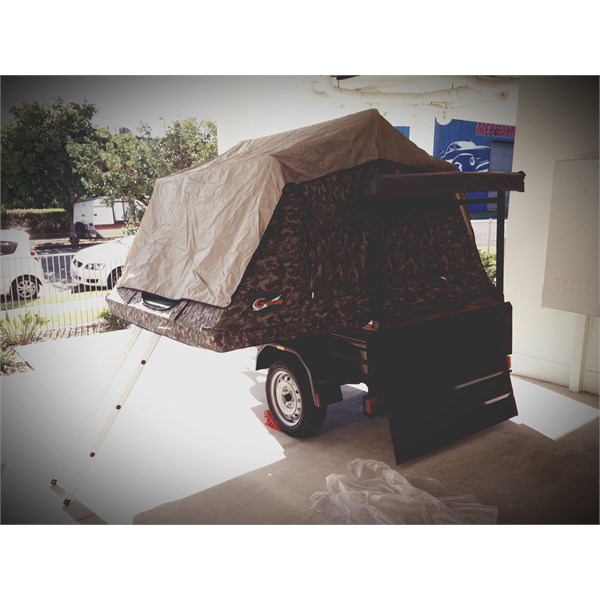
Rear awning closed